This post covers the initial steps I took to setup my five-node Raspberry Pi 3 cluster with SLURM, a scheduler and resource manager for High-Performance Computing (HPC) clusters. Did I end up with a fast HPC resource? Well, no. With 1GB memory and a 4-core ARM processor each, it is like I strung together a couple of cell phones. Do I really need to use SLURM, a scheduler used on some of the largest supercomputers in the world? Also, no. There are much simpler options with less overhead available for a small cluster like this. But since when are such at-home, DIY projects intended to be practical?
There are some key items missing from this post. I still haven’t created any shared users or setup any monitoring/maintenance software. I also haven’t queued any starter MPI programs to run yet. This will come later.
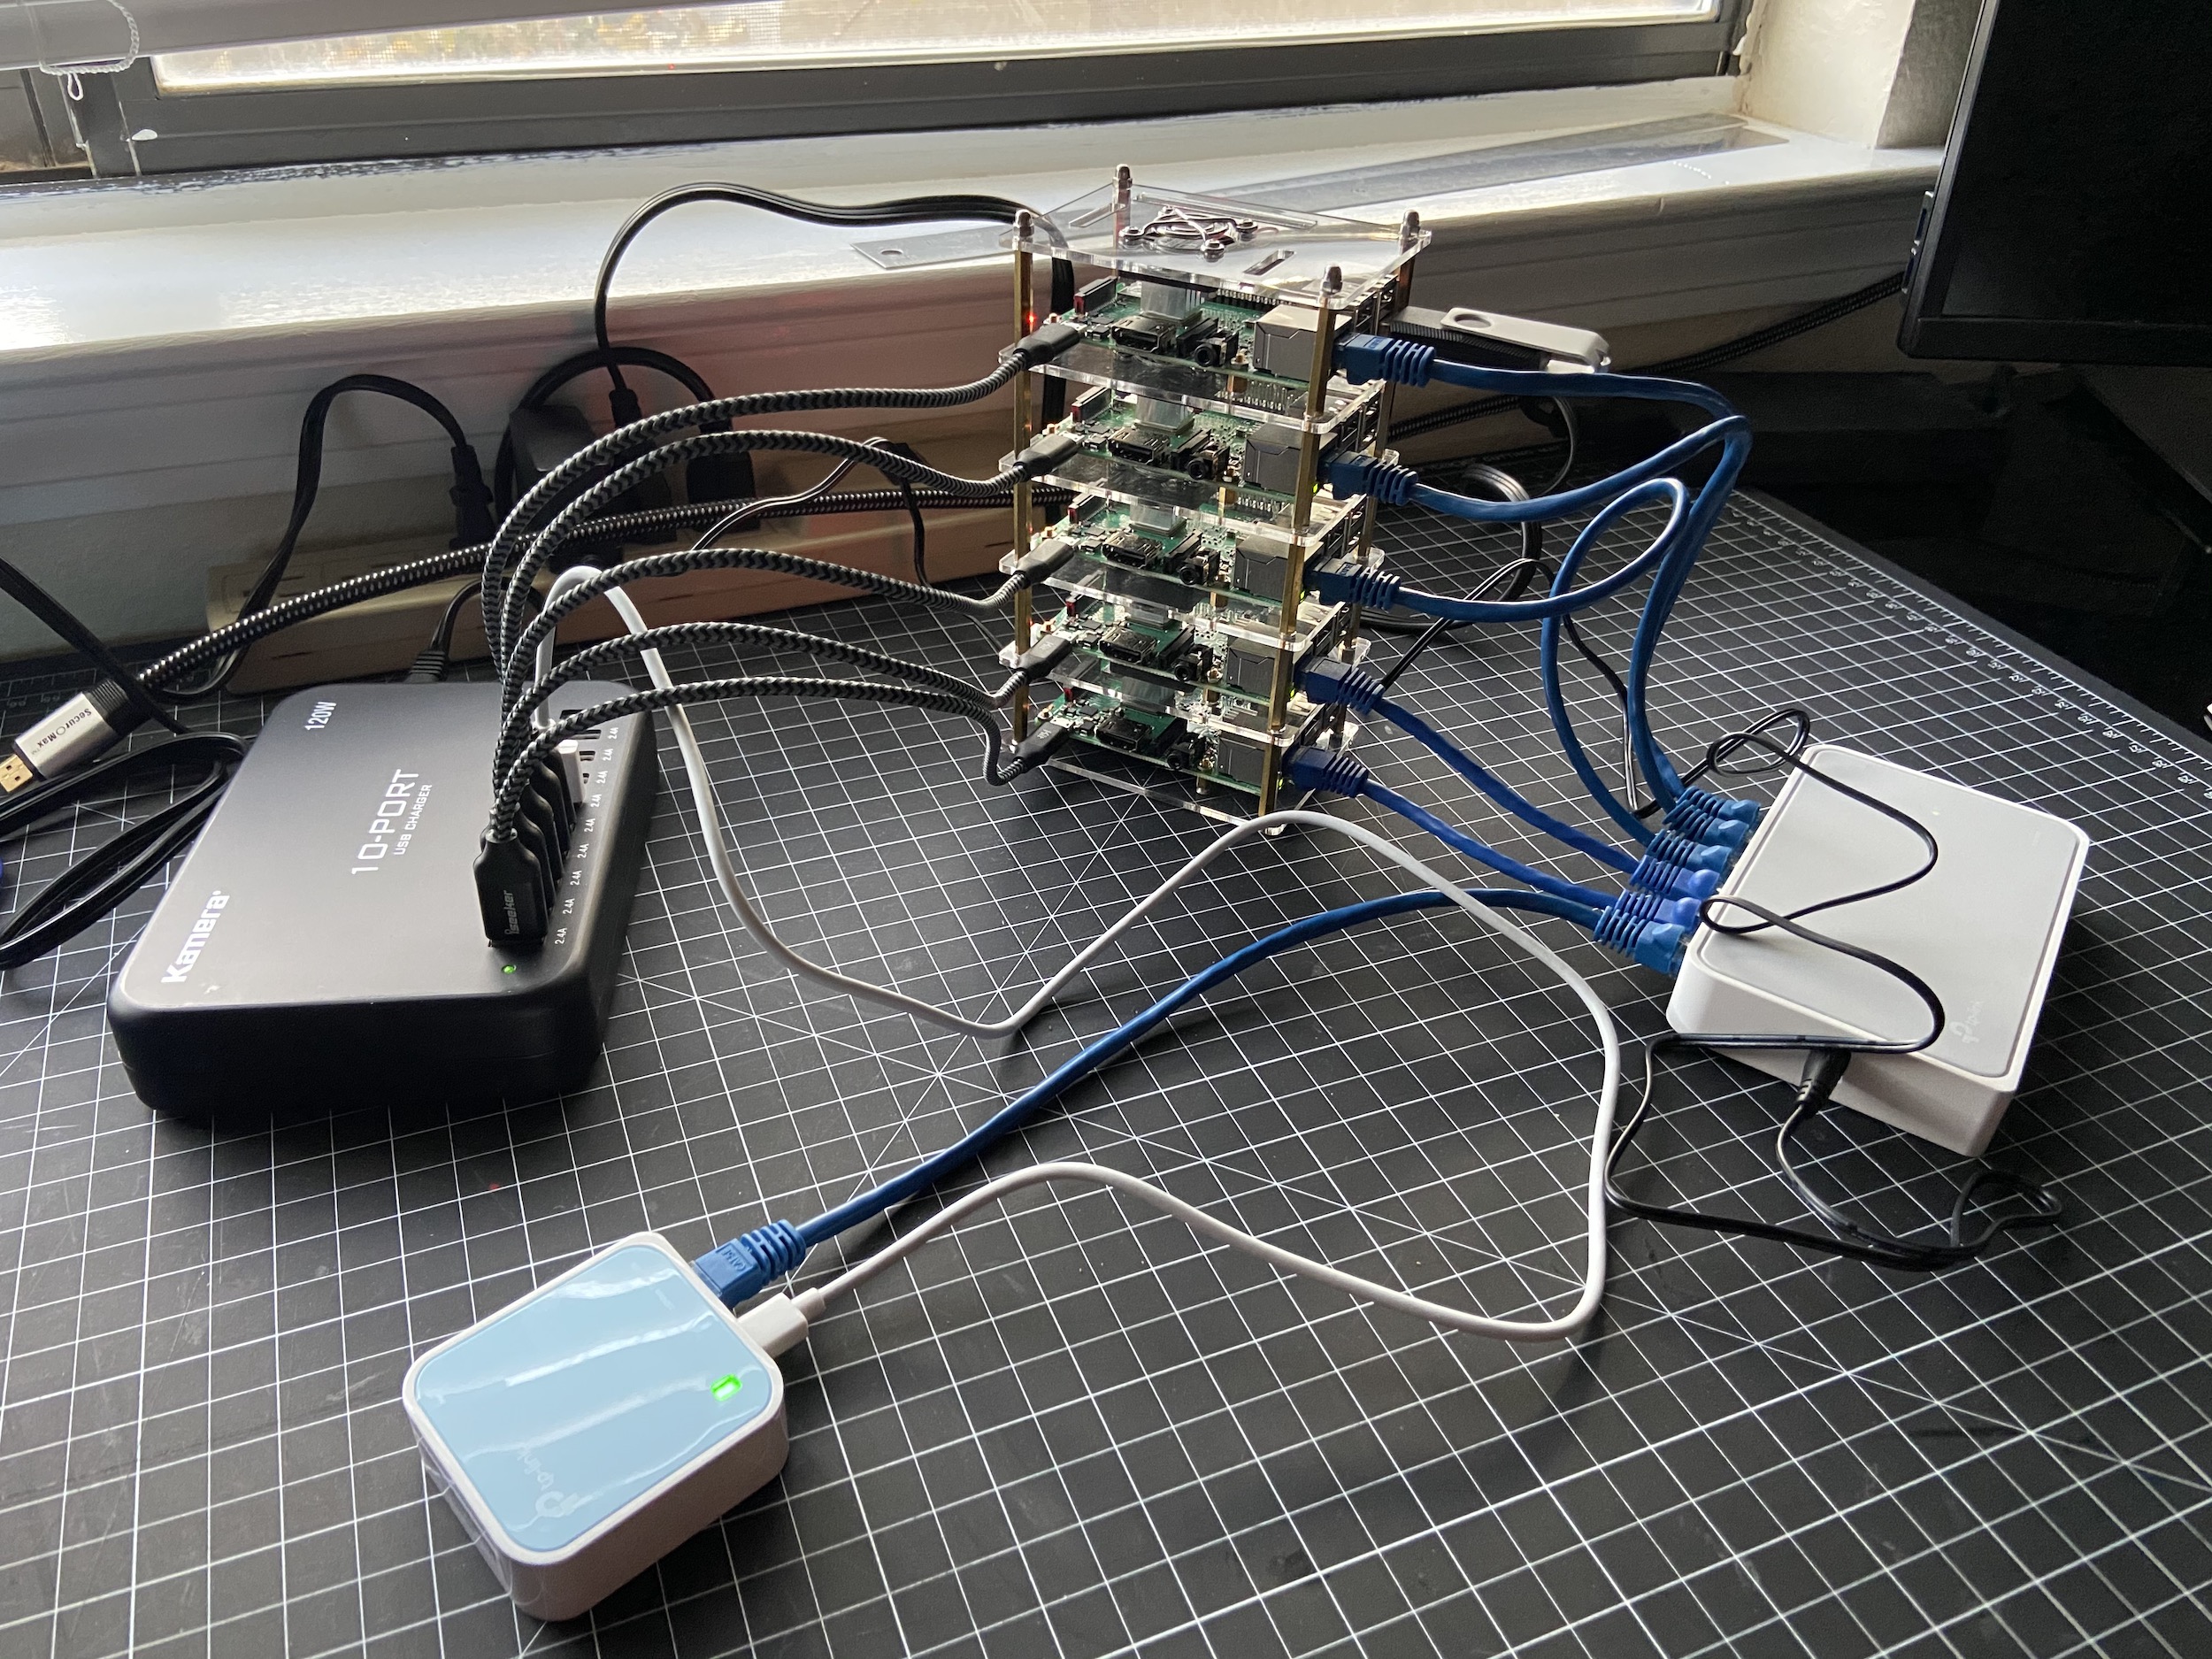
Materials
- 5 Raspberry Pi 3s
- 5 16 GB SD cards loaded with NOOBS
- 5 Heat sink sets
- USB charger
- 5 short micro USB cables
- 8-Port Ethernet Switch
- Travel Router (So I don’t have to connect the switch into my router)
- 6 short ethernet cords
- 64 GB Flash Drive
- Cluster case
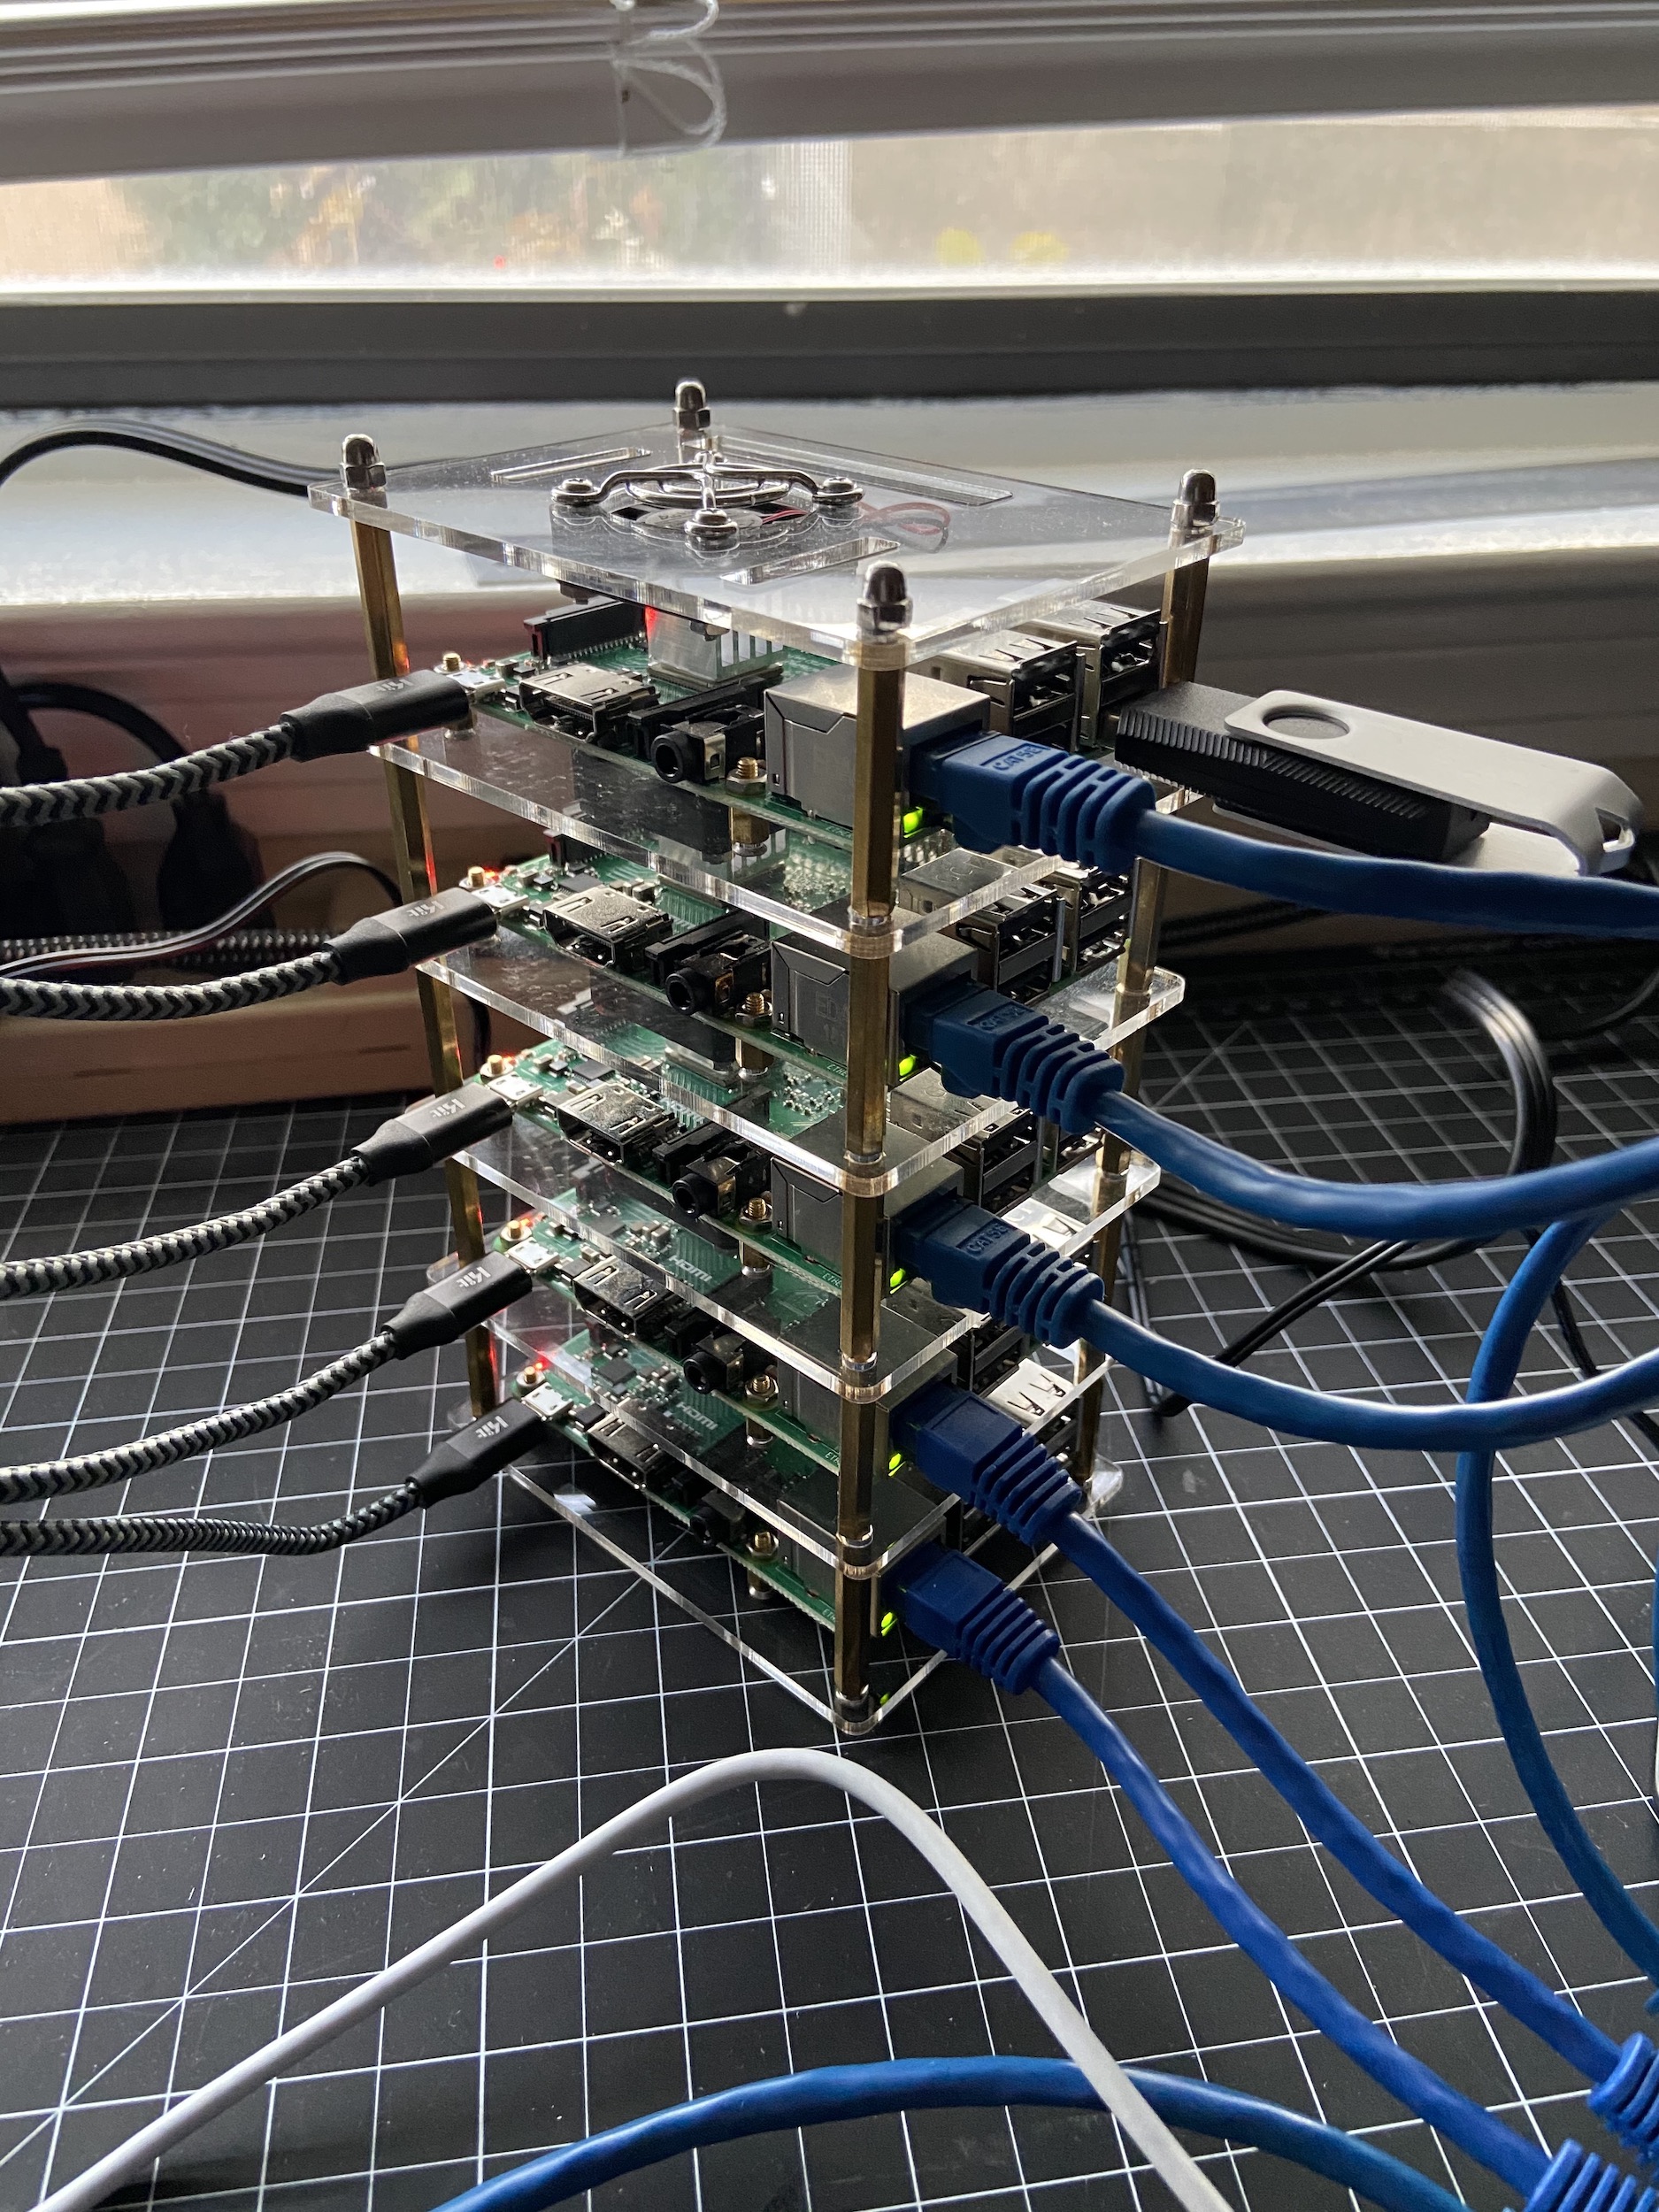
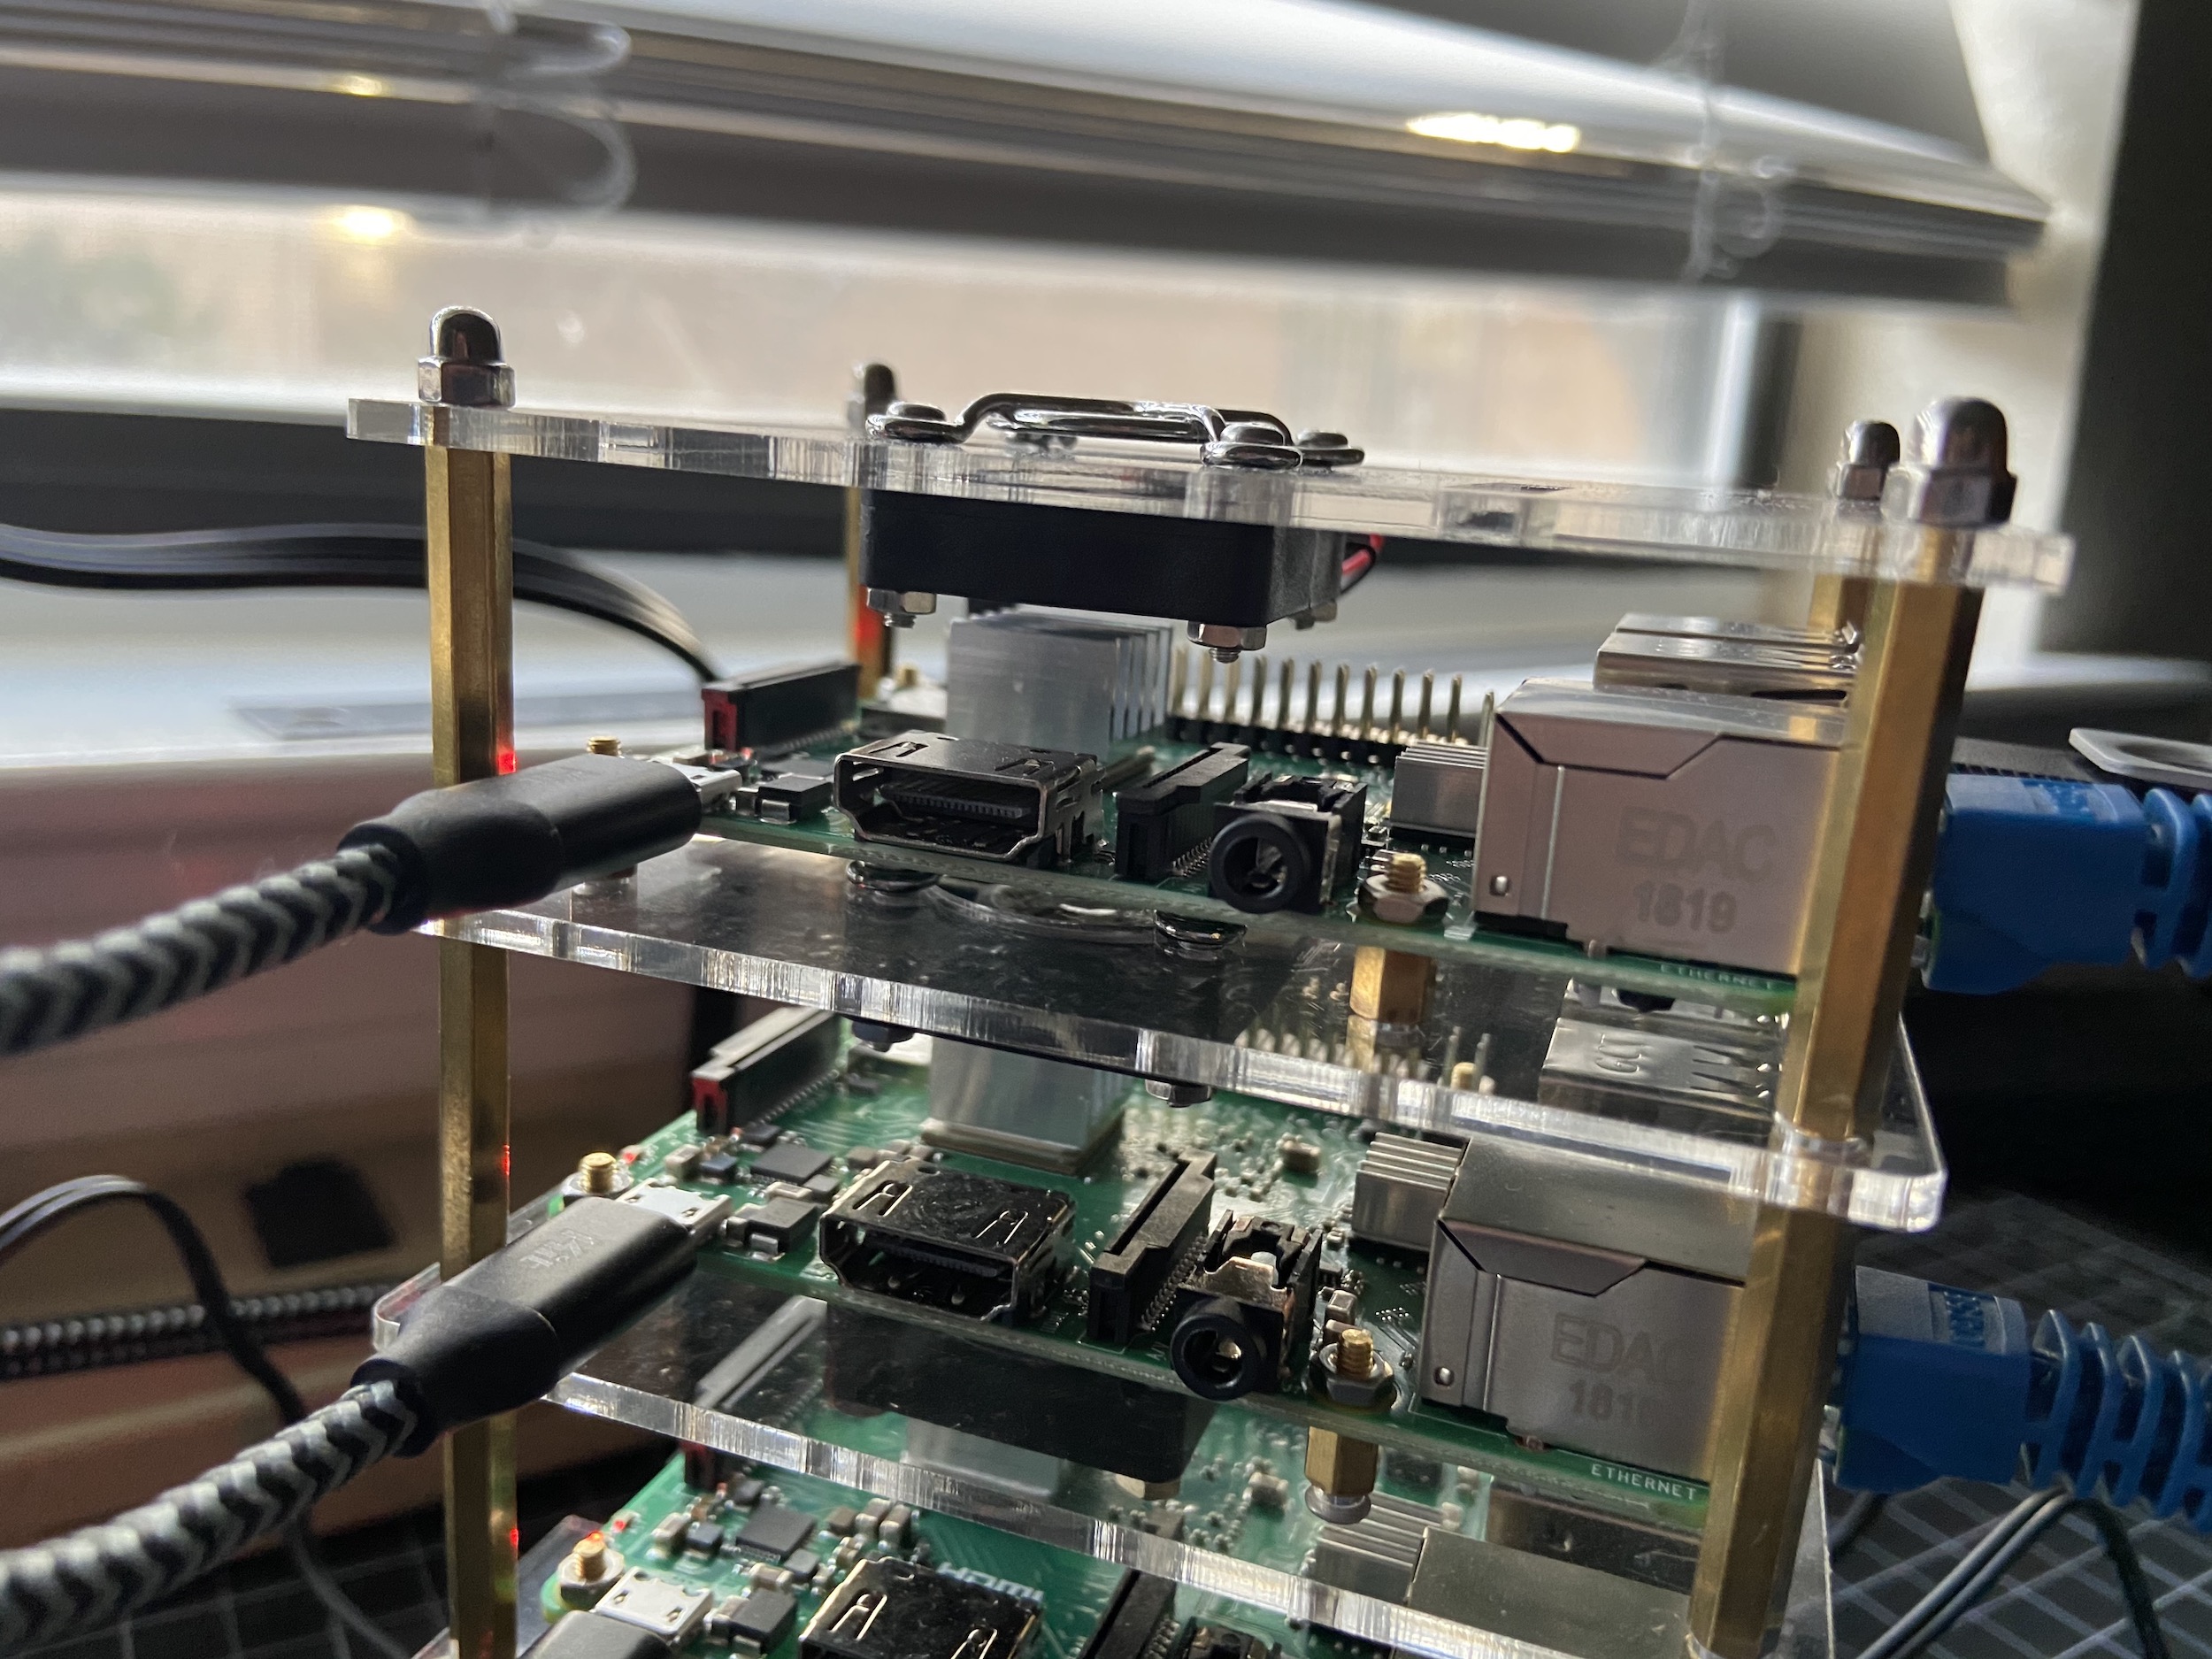
Assemble Rack
Do not plug any of the Pis into power yet!
- Add the heat sinks on top of the CPUs and the LAN Chips for each Pi.
- Insert a NOOBS microSD card with the label facing downward for each Pi.
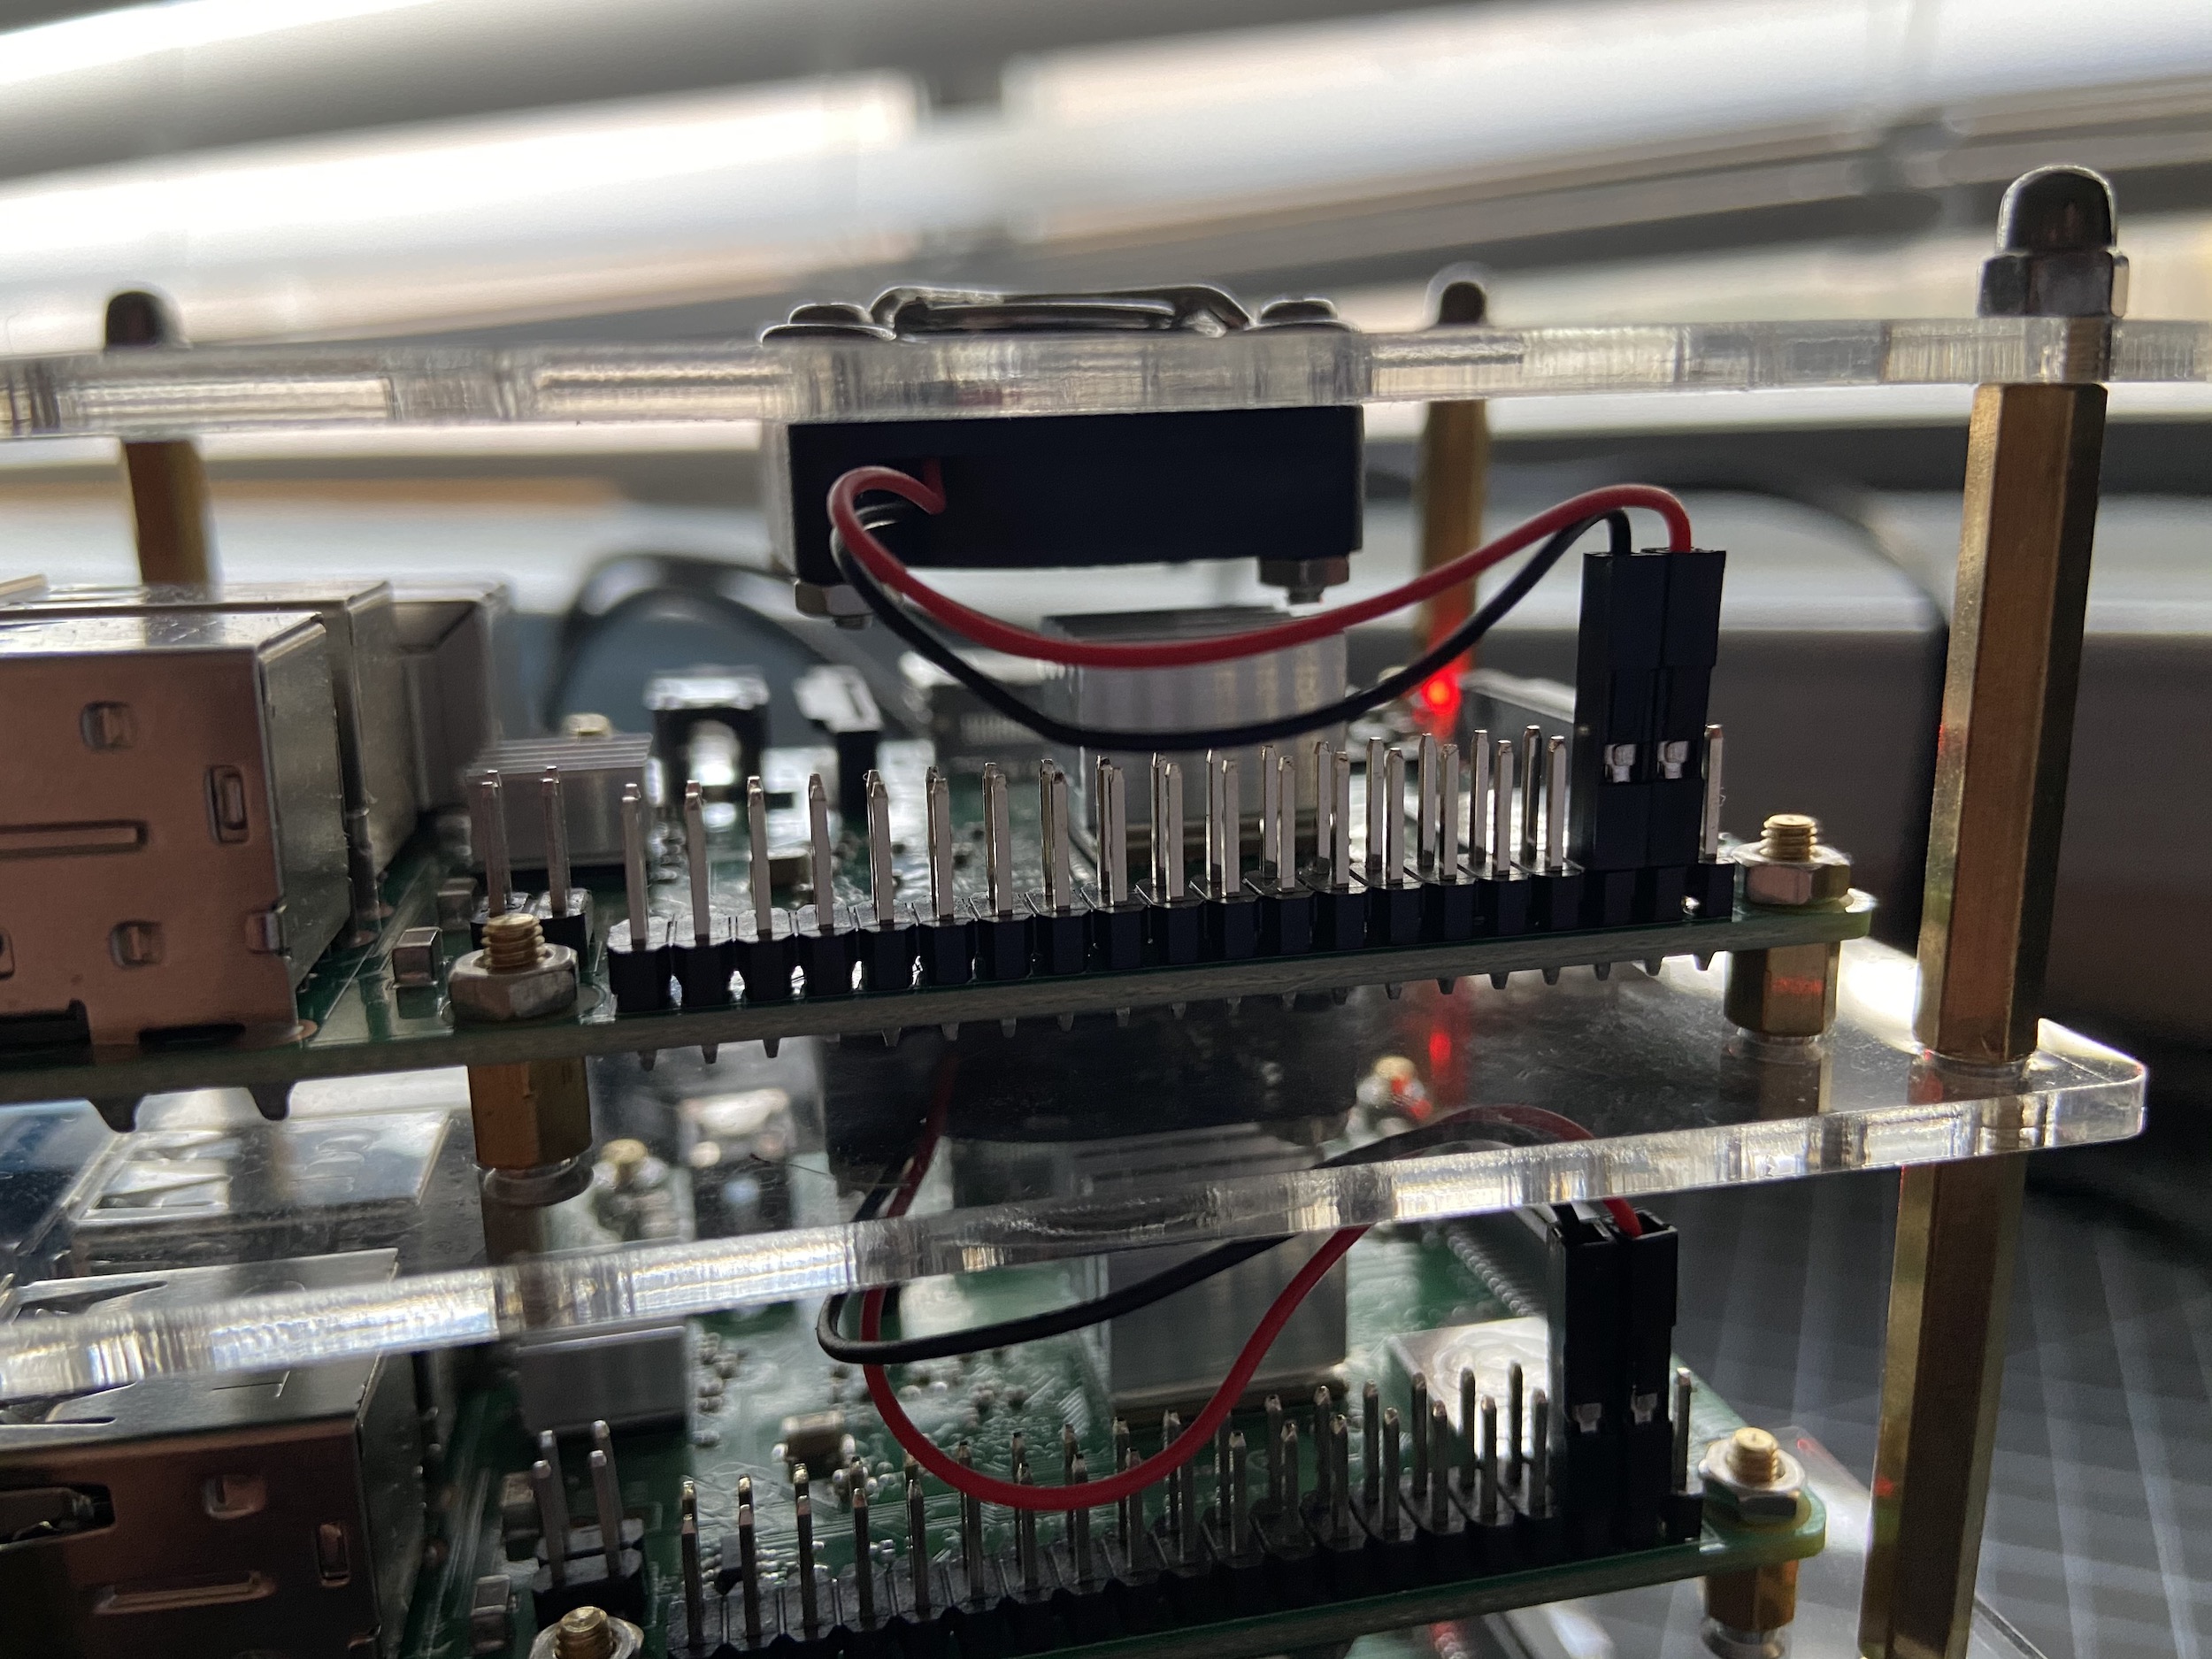
- Follow the cluster case instructions. Install fans with label facing up and with the red wire plugged into the 5V GPIO pin and the black wire plugged into a ground pin (see images).
Set Up the Master Node
- Plug in a monitor using HDMI, a mouse using USB, and a keyboard using USB.
- Plug into power supply.
- Select your WiFi network
- At the bottom of the screen, change your keyboard language if necessary.
- Select the Raspbian option and click install.
- After it boots up, select your country, language, and timezone
- Change your Pi’s password. Select a strong password as you have connected it to the internet.
- Finish filling out the initial config options and wait for the Pi to update.
- Restart your Pi
- Open Terminal (icon on top menu bar)
- Run these 3 commands:
- sudo apt-get update
- sudo apt-get install realvnc-vnc-server realvnc-vnc-viewer
- sudo raspi-config
- Select interfacing options
- Enable VNC
- Select network options
- Create hostname – node01 – if you want to install SLURM, you need to use this naming convention <consistent_name_for_all><unique_number>: example node 01
- Reboot your Pi for the changes to take effect
- Sign up for RealVNC – https://www.realvnc.com/en/raspberrypi/#sign-up
- On the Pi, click the VNC icon on the top-right corner of the screen. Then click the hamburger button in the top right and select Licensing
- Add the email and password you used to sign up for Real VNC, change the computer name in team to the hostname you applied in step 13
- Download/install the VNC viewer to the computer you want to control the Pi from (so that the monitor, keyboard, and mouse and no longer necessary)
- Open VNC view and sign in. You will see your Pi listed. You may need to authorize sign-in through your email.
- Enter in your Pi’s username and password. The default username is pi and the password is the one you set in step 9.
- Disconnect the monitor, keyboard, mouse. You will now finish setting up through VNC viewer.
- In the VNC GUI, click the Raspberry Pi Menu button (Upper left) > Preferences > Raspberry Pi configuration
- In the Interfaces tab, click enable on all options. You might want these later.
- Reboot Pi
- Open Terminal again and run the following commands:
- sudo apt-get install build-essential
- sudo apt-get install manpages-dev
- sudo apt-get install gfortran
- sudo apt-get install nfs-common
- sudo apt-get install nfs-kernel-server
- sudo apt-get install vim
- sudo apt-get install openmpi-bin
- sudo apt-get install libopenmpi-dev
- sudo apt-get install openmpi-doc
- sudo apt-get install keychain
- sudo apt-get install nmap
- sudo apt install ntpdate -y
- Run cat /sys/class/net/eth0/address to get your MAC address
- Run ifconfig to get your IP address and Net Mask. This is listed under the wlan0 section since you are connected via wifi
- Run netstat -nr and write down gateway address
- Set up static IP addresses for ethernet and wifi (these need to be different and also something another device on your network wouldn’t have)
- sudo nano /etc/dhcpcd.conf
- Add the following lines to the top of the file (minus the numbers in front of the lines), modify the values for your new ips and your gateway:
- interface eth0 # ethernetstatic
- ip_address=10.0.2.200/24 # before the slash this is your new ip, it should start with your gateway numbers with the numbers after the last dot unique to this Pi, the /24 is if you have 255.255.255.0 netmask which is likely for a home network
- static routers=10.0.2.1 # the gateway
- static domain_name_servers=10.0.2.1 # the gateway
- interface wlan0 #wifi
- static ip_address=10.0.2.201/24 # this is for WiFi, use a different IP
- static routers=10.0.2.1
- static domain_name_servers=10.0.2.1
- Restart your pi sudo reboot
Set Up the Servant Nodes (a.k.a. Compute Nodes)
- Follow the same steps as above.
- Use and track different static ip addresses.
- Track the MAC addresses for connecting via switch.
- Use consistent names if you plan on installing SLURM as your resource manager.
- You don’t need to sign up for Real VNC again. Sign in to each Pi with your account.
Networking
Some switches will require you to log into their admin interface and set the static IPs. Use the MAC addresses and static IPs you marked down if this is the case.
- Connect Pis to switch with ethernet cords.
- Connect switch to travel router with ethernet cord.
- Power on switch and travel router.
- Set up travel router as a client according to its instructions.
- Use the VNC Viewer to log into and turn off the wifi from each Pi.
- On your main computer, edit your /etc/hosts file so that you can ssh to your Pis using their hostname and not their ip. Add a line for each node and use the static ethernet IP you set up for each. Example line:
- 10.0.2.200 node01
Shared Network File System (NFS)
- ssh to your master node. (remember to use your default username at this point ssh pi@node01)
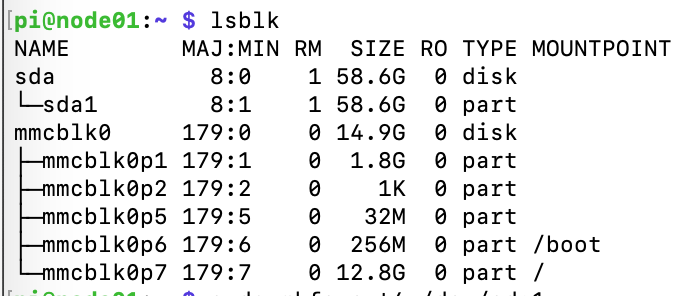
- Plug in your flash drive to a USB port on your master node.
- Figure out its /dev location with lsblk. In this example it is located at /dev/sda1
- Format the drive with this command: sudo mkfs.ext4 /dev/sda1
- Create the mount directory with these commands. I used open permissions at this point.
- sudo mkdir /scratch
- sudo chown nobody.nogroup -R /scratch
- sudo chmod 777 -R /scratch
- Find the uuid for /dev/sda1 with blkid.
- Edit fstab to mount this filesystem on boot with sudo nano /etc/fstab
- Add the following line. Modify with your uuid.
- UUID=fdcd70f1-fd9e-465d-9bd0-f9169b7cfb47 /scratch ext4 defaults 0 2
- Mount the drive with sudo mount -a
- Again, setting open permissions on the mounted drive:
- sudo chown nobody.nogroup -R /scratch
- sudo chmod -R 766 /scratch
- Edit /etc/exports. Add the following line, but replace ip addr with your gateway with the last 1 replaced with a zero plus your netmask number after a slash.
- /scratch 10.0.2.0/24(rw,sync,no_root_squash,no_subtree_check)
- Update the NFS kernel server with sudo exportfs -a
- SSH to and mount the directory on all of the servant nodes:
- Run these commands:
- sudo mkdir /scratch
- sudo chown nobody.nogroup /scratch
- Add the following line to /etc/fstab, replace with your masternode’s IP:
- <master node ip>:/scratch /scratch nfs defaults 0 0
- Mount it with sudo mount -a
- Change the file permissions with sudo chmod -R 777 /scratch
- Run these commands:
Install SLURM on Master Node
- SSH to your master node.
- Edit /etc/hosts file and add a line for the other four nodes like you did for your main computer so it will recognize the other nodes by their hostname.
- Install SLURM with sudo apt install slurm-wlm -y
- Use SLURMs default config file to start your config file:
- cd /etc/slurm-llnl
- sudo cp /usr/share/doc/slurm-client/examples/slurm.conf.simple.gz .
- sudo gzip -d slurm.conf.simple.gz
- sudo mv slurm.conf.simple slurm.conf
- Edit /etc/slurm-llnl/slurm.conf
- Add the ip address of the master node:
- SlurmctldHost=node01(<ip addr of node01>)
- Comment out this line:
- #SlurmctldHost=workstation
- Set the cluster name
- ClusterName=hi-five-pi
- Towards the end of the file, delete the example compute node entry and then add information for all your nodes. Example line for one node:
- NodeName=node01 NodeAddr=<ip addr node01> CPUs=4 State=UNKNOWN
- Create a default partition.
- PartitionName=general Nodes=node[02-05] Default=YES MaxTime=INFINITE State=UP
- Add the ip address of the master node:
- Create a file called /etc/slurm-llnl/cgroup.conf – cgroup
- Whitelist system devices by creating /etc/slurm-llnl/cgroup_allowed_devices_file.conf – cgroup_allowed_devices_file
- Copy all of the files we created/edited to /scratch so that we can use them on the other nodes:
- sudo cp slurm.conf cgroup.conf cgroup_allowed_devices_file.conf /scratch
- sudo cp /etc/munge/munge.key /scratch
- Start SLURM with these commands:
- sudo systemctl enable munge
- sudo systemctl start munge
- sudo systemctl enable slurmd
- sudo systemctl start slurmd
- sudo systemctl enable slurmctld
- sudo systemctl start slurmctld
Install SLURM on Compute Nodes (Repeat on all Compute Nodes)
- SSH to node
- Install slurm with sudo apt install slurmd slurm-client -y
- Edit /etc/hosts file to include the 4 other Pis
- Copy the configuration files with these commands
- sudo cp /scratch/munge.key /etc/munge/munge.key
- sudo cp /scratch/slurm.conf /etc/slurm-llnl/slurm.conf
- sudo cp /scratch/cgroup* /etc/slurm-llnl
- Start SLURM with these commands.
- sudo systemctl enable munge
- sudo systemctl start munge
- sudo systemctl enable slurmd
- sudo systemctl start slurmd
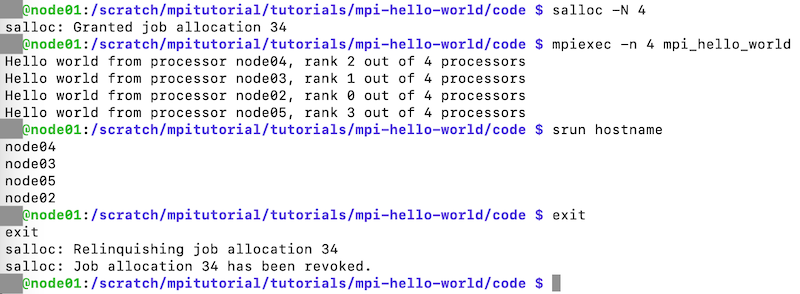
Test SLURM
If this part fails, try rebooting all nodes. Then inspect your config files. Restart the services if you make changes.
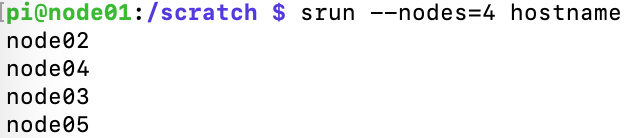
- SSH to master node
- Run sinfo to see your partition information.
- Run a job on four nodes to make them print their hostname:
- srun –nodes=4 hostname
Resources
- Building a Raspberry Pi Cluster by Răzvan T. Coloja
- Building a Raspberry Pi Cluster by Garret Mills
- Build Supercomputers with Raspberry Pi 3 by Carlos R. Morrison